


09/05/2019
in EcoSystem
Docs As Code – Continuous Delivery of Presentations with reveal.js and Jenkins – Part 1
Table of Contents
Intro and Deployment to GitHub Pages
Reveal.js allows software developers to use web technologies (HTML, CSS, JavaScript) to deploy slides for presentations and to display them in the browser. This eliminates the dreaded mouse-driven excursion into the world of PowerPoint/Impress, with its incompatibilities between Microsoft Office, Libre/OpenOffice, problems with Linux, and exclusive access requirements to make editing changes. On the one hand, this solution utilizes all of the advantages of the web (e.g. multimedia, hypermedia, UTF-8, platform independence, accessibility over the internet, plugins, etc. – see also the example presentation for reveal.js). On the other hand, presentations are also examples of “documentation as code”, so they can be treated like code. Developers can use the same tools for creating presentations as they do to carry out their day-to-day work. For example, the slides can be written in markdown and stored in a Source Code Management (SCM) system (usually Git, which is, e.g. provided by SCM-Manager/ or GitHub). This makes it possible to revise and version presentations, allow users to simultaneously work on them, branch and merge them, etc. In addition, presentations can be automatically deployed from there every time they are changed. This provides you with a Continuous Delivery mechanism for your presentations! This means that a new version of the presentation is automatically made available with each Git Push. By using a Git-based wiki like Smeagol(see the blog post), changes can be made directly in the browser. Therefore, when changes are saved to the wiki, this causes the presentation to be deployed.
This series of articles shows how to implement a Continuous Delivery Pipeline for presentations with the CI Server Jenkins on the basis of a real-world example. This article describes the following target environment as examples for this CI process:
- GitHub pages (Part 1)
- Sonatype Nexus (Part 2) and
- Kubernetes (Part 2).
In general, the article shows how easy life can be with Jenkins Pipeline Continuous Delivery, and it provides examples for different target environments.
Depending on the existing infrastructure and the target environment, the process for everything from changing the slides to deploying them can vary:
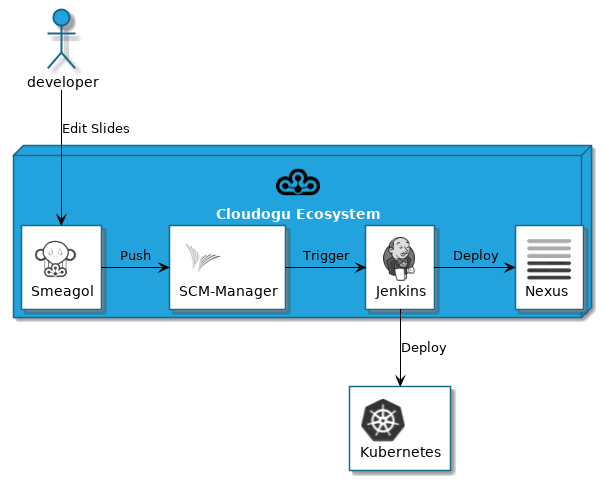
- Exclusively using the tools in the Cloudogu EcoSystem, e.g., those that are used for internal development (see Figure 1)
- Text editing in the Smeagol wiki
- Version management with SCM-Manager
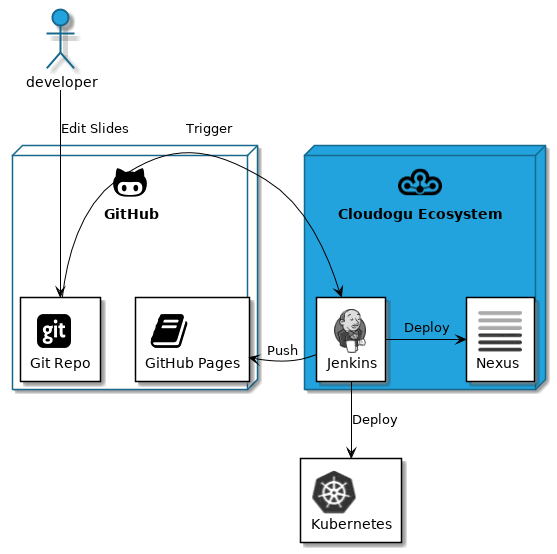
- With GitHub and the Cloudogu EcoSystem, e.g., for public repositories (see Figure 2)
- Version management with GitHub
- Deployment to GitHub Pages
- In both cases deployment may also be made to Nexus or Kubernetes.
- Of course, Jenkins and Nexus can also be run as individual tools if they are so configured.
Try it yourself and install a complete toolchain in less than 30 minutes:
Cloudogu EcoSystem quickstart guide
Cloudogu EcoSystem quickstart guide

Usage with Cloudogu
The target deployment environments featured in this series of articles are taken directly from real examples. At Cloudogu, reveal.js presentations are used in the following scenarios among others:
- Our Kubernetes and Docker training will (obviously) be deployed from the Cloudogu EcoSytem to Kubernetes (K8s).
- We share public presentations from conferences via GitHub pages, e.g., “3 things every developer should know about K8s security” at KubeCologne 2019
- In addition, we have a repository in SCM-Manager whose content is deployed to Nexus for internal presentations.
With this, you can create a new presentation using a simple
git branch, which provides Continuous Delivery through a Jenkins multibranch pipeline with no additional effort.
Implementation
You can find out how to do this using the upstream repository for all our presentations cloudogu/continuous-delivery-slides.
It is based directly on the repository of reveal.js, and adds to it:
- A Jenkinsfile, which is used to implement the Continuous Delivery Pipeline
- A pom.xml for deployment to Nexus
- Dockerfile and K8s.yaml for deployment to Kubernetes
- Additional features for reveal.js:
- Font awesome icons can be used
- Markdown files are loaded from the docs/slides directory (additional files must be added to the index.html in
<div class="slides">). - Example slides in the
docs/slidesdirectory, which illustrates the features and syntax
- .smeagol.yml to allow editing in Smeagol and docs/Home.md, as the home page of the Smeagol wiki, which provides more tips on how to use it (for example, how to work effectively with slides, how to upgrade the underlying reveal-js version, or how to export the slides as a PDF file).
- Browser-agnostic rendering of UTF-8 “emojis”
- Styling the slides using the Cloudogu corporate identity (in the folder CSS).
- Stay tuned for more features, such as Continuous PDF delivery
In what follows we will describe the technical details of the Continuous Delivery Pipeline.
Cloudogu EcoSystem
Convince yourself of the advantages of the Cloudogu Ecosystem. Use the modern DevOps platform now for free.
Learn more about itContinuous Delivery with Jenkins
The Continuous Delivery Pipeline is described in the Jenkinsfile, which is executed in Jenkins using the Pipeline plugin (also see our article series for more information about this topic).
The following listing shows the skeleton of the Jenkinsfile. For reasons of legibility, it has been somewhat simplified for the article, and the stages and steps are demonstrated in the following sections.
For the full version, see GitHub.
You can experience the build in action on our open-source Jenkins instance.
You can view the finished presentation on the GitHub pages.
@Library('github.com/cloudogu/ces-build-lib@bc4b83b')
import com.cloudogu.ces.cesbuildlib.*

node('docker') {

    Git git = new Git(this, 'cesmarvin')

    catchError {

        Maven mvn = new MavenInDocker(this, "3.5.0-jdk-8")

        stage('Checkout') {
            checkout scm
            git.clean('')
        }

        String versionName = createVersion(mvn)

        stage('Build') {
            // ... For details, see below
        }

        stage('package') {
            // ... For details, see below
        }

        stage('Deploy GH Pages') {
              // ... For details, see below:
        }

        stage('Deploy Nexus') {
            // ... See part 2 for details
        }

        stage('Deploy Kubernetes') {
            // ... See part 2 for details
        }
    }

    mailIfStatusChanged(git.commitAuthorEmail)
}
Requirements for Jenkins
The pipeline is heavily dependent upon the Docker to minimize configuration requirements for Jenkins as much as possible:
- Except for the default plugins included (for example, Pipeline Plugin, GitHub Groovy Libraries for ces-build-lib – see below) and an agent, the Jenkins master only require minimal configuration.
- Exception: Kubernetes Continuous Deploy is used for deployment on Kubernetes.
- The Jenkins Agent (previously also referred to as Slave) must have a working
dockerCLI on thePATH. A connection is established between the Jenkins Agent and the job via labels. Here theJenkinsfilerequires an agent with the labeldocker:node ('docker'). - The necessary steps and credentials for the respective deployments are listed in the respective sections.
Jenkins Pipeline Shared Library ces-build-lib
The Pipeline uses the Shared Library ces-build-lib. It includes abstractions for Docker, Git, Maven, and the Nexus Repository, among other things. This makes deployment to Nexus and GitHub Pages much less complex, and it provides a central implementation.
Error handling is also convenient: mailIfStatusChanged (git.commitAuthorEmail) sends the typical Jenkins e-mails (failed, unstable, stable again) dynamically to the author of the last commit instead of to a manually maintained group of recipients. The fact that it comes after the catchError block means that it is also executed in case of error.
Version name
String createVersion(Maven mvn) {
    String versionName = "${new Date().format('yyyyMMddHHmm')}-${new Git(this).commitHashShort}"

    if (env.BRANCH_NAME == "master") {
        mvn.additionalArgs = "-Drevision=${versionName} "
        currentBuild.description = versionName
    } else {
        versionName += '-SNAPSHOT'
    }
    return versionName
}
One challenge with Continuous Delivery Pipelines always is the automatic assignment of version names.
In this example, we chose the combination <date> – <GitCommitHash>, e.g. (201904261520-077def6), because it’s easy to calculate, it’s unique enough, and it has proven itself in practice with Cloudogu.
This is realized using the method createVersion (). At this point it also shows how to implement a branch-based delivery model: Commits on the Master Branch go into production, whereas all others are SNAPSHOT versions and will be indicated as such.
In addition, the version name is set as a description (currentBuild.description) in Jenkins, which appears in the Jenkins interface next to the build number.
Structure of the Jenkinsfile
The Jenkinsfile is divided into stages, which are described below:
Checkout– retrieves the code from the Git repository.BuildandPackage– create the static web application that contains the presentations.- Example
Deploystages to GitHub Pages, Nexus, and Kubernetes.
The following figure shows the stages in the Jenkins BlueOcean plugin.
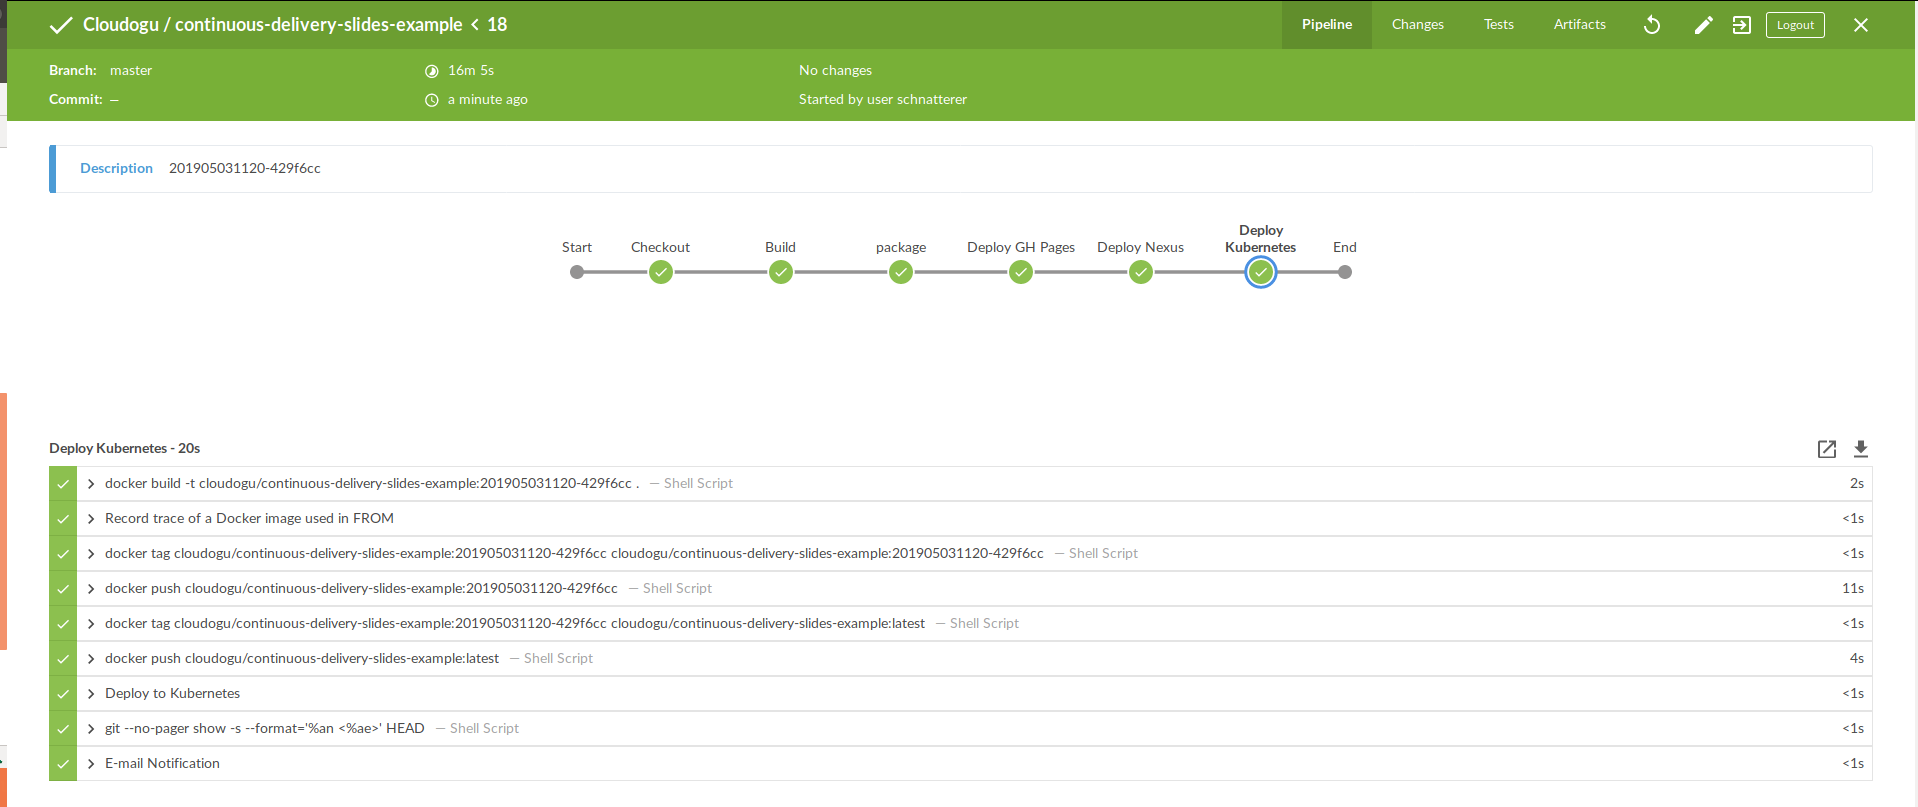
Build and package stages
def introSlidePath = 'docs/slides/01-intro.md'
Docker docker = new Docker(this)

stage('Build') {
    docker.image('node:11.14.0-alpine')
      .mountJenkinsUser()
      .inside {
        sh 'npm install'
        sh 'node_modules/grunt/bin/grunt package --skipTests'
    }
}

stage('package') {
    docker.image('garthk/unzip').inside {
        sh 'unzip reveal-js-presentation.zip -d dist'
    }

    writeVersionNameToIntroSlide(versionName, introSlidePath)
}

// ...

private void writeVersionNameToIntroSlide(String versionName, String introSlidePath) {
    def distIntro = "dist/${introSlidePath}"
    String filteredIntro = filterFile(distIntro, "<!--VERSION-->", "Version: $versionName")
    sh "cp $filteredIntro $distIntro"
    sh "mv $filteredIntro $introSlidePath"
}

String filterFile(String filePath, String expression, String replace) {
    String filteredFilePath = filePath + ".filtered"
    // Fail command (and build) if file not present
    sh "test -e ${filePath} || (echo Title slide ${filePath} not found && return 1)"
    sh "cat ${filePath} | sed 's/${expression}/${replace}/g' > ${filteredFilePath}"
    return filteredFilePath
}
First, the build required for reveal.js is executed. Here, the npm binary provided by the node Docker container is used to install packages and then to execute the grunt build of reveal.js.
To avoid permissions issues, Jenkins generally runs the docker.inside() steps with the UserID (UID) that has also been used to run the Jenkins agent (docker run -u UID). Obviously, npm in particular cannot handle it if this UID cannot be found in/etc/passwd. Therefore, the mountJenkinsUser() provided by the Docker abstraction from the ces-build-lib is used here to avoid EACCES: permission denied errors.
The execution of the reveal.js tests is skipped here using --skipTests because puppeteer (using Headless Chrome and X-Server), which is used by reveal.js can only be executed in Docker with great difficulty.
Since at this point we are not yet talking about developing reveal.js, but only about using it, it is not bad practice to skip the tests here.
In order to package only the files really needed from the repository (because Jenkinsfile,Dockerfile, etc. may under no circumstances be deployed, since sensitive data about the infrastructure is contained in these files), we use a trick:
- Reveal.js already has a
zipgrunt task, which is able to create just the package that is needed. - This zip is simply unpacked in the
packagestage.
Finally, the version name is written to the title slide using sed, which replaces the <! - VERSION -> placeholder.
Now everything is ready for the deployment. We provide a description of the GitHub Pages target environment as a deployment example in what follows. In the second part of our article series we discuss Nexus and Kubernetes as additional examples.
Deployment to GitHub Pages
Git git = new Git(this, 'cesmarvin')

stage('Deploy GH Pages') {
    git.pushGitHubPagesBranch('dist', versionName)
}
Technically speaking, a deployment to GitHub pages is a git push to the gh-pages branch. This branch must exist in the repository and be enabled in the repository settings.
In the pipeline, the deployment itself is just a simple call to Git.pushGitHubPagesBranch() steps from ces-build-lib. Proper authentication and authorization at GitHub are important steps at this stage. You need:
- A GitHub user account
- with write access to the GitHub repo and
- credentials that are stored as
Username with passwordcredentials in Jenkins. - This allows for the ID for these credentials to be passed to the Git object. This is
cesmarvinin the example:new Git(this, 'cesmarvin') - Note: It’s good practice to generate a personal access token on GitHub specifically for this use case and to use it instead of your password. The permissions for this access token can be kept minimal and limited to just what is needed for this use case. It can be deleted at any time. Should it fall into the wrong hands, it does not present the same problem as a compromised password. Another option would be to use special GitHub Deploy Keys for the repository. This is currently not yet implemented in ces-build-lib.
The deployed result in our example can be viewed directly in the GitHub pages in the example repository.
Outlook
In this first part of this article series, we have introduced the benefits of the Continuous Delivery of reveal.js presentations and presented usage examples. We provided a detailed description of the implementation using a Jenkins Pipeline, and finally we offered an example of deployment to GitHub Pages. The second part in our article series will show how to alternatively deploy the presentations to Sonatype Nexus or to a K8s cluster.
If you look beyond its immediate benefits as a browser-based presentation solution, you will see how this solution allows you to achieve Continuous Delivery for web applications. We have provided concrete examples of this for different platforms here.
Get your personal product demonstration with us. In only 30 minutes we will answer all your questions and show you the installation and operation of the Cloudogu EcoSystem.
This article is part 1 of the series „Continuous Delivery for Presentations“.
Read all articles now:


