


04/19/2018
in Technology
Coding Continuous Delivery — Jenkins pipeline plugin basics
Table of Contents
If you’ve ever used a conventional CI tool to set up a Continuous Delivery pipeline by chaining individual jobs without any direct pipeline support, then you’ll know just how complicated this can get. In this article series, we’ll explain how a pipeline can be defined as code in a central location using the Jenkins pipeline plugin. In the first part of this article series, we’ll take a look at the basics and share some practical tips for getting started.
Continuous Delivery has proven its worth as a suitable approach in agile software development for the release of high-quality reliable and repeatable software in short cycles. Software changes are subject to a series of quality assurance steps before they reach production. A typical Continuous Delivery pipeline could look as follows:
- Checkout from version control
- Build
- Unit tests
- Integration tests
- Static code analysis
- Deployment in a staging environment
- Functional and/or manual tests
- Deployment in production
It is essential here to automate all of the steps; this is typically done using Continuous Integration servers such as Jenkins.
Conventional Jenkins jobs are good for automating individual steps of a Continuous Delivery pipeline. However, because each step builds on the previous one, their order must be retained. If you’ve ever set up and run a Continuous Delivery pipeline using conventional Jenkins jobs (or other CI tools without direct pipeline support), then you’re probably already aware how quickly this can get complicated. Individual jobs – often complemented with countless pre- and post-build steps – are chained. Meaning you have to trawl through job after job to understand what’s going on. In addition, such complex configurations cannot be tested or versioned, and must be set up again for every new project.
The Jenkins pipeline plugin can help here. It enables definition of the entire pipeline as code in a central location using a Groovy DSL in a versioned script file (Jenkinsfile). There are two styles of DSL to choose from: an imperative, rather scripted style (referred to hereafter as scripted syntax) and, since February 2017, also a declarative style (referred to hereafter as declarative syntax). Declarative syntax is a subset of scripted syntax and, with its predefined structure and more descriptive language elements, offers a basic structure (similar to a Maven POM file) that can make it easier to get started. Despite being more verbose and less flexible, the outcome is build scripts that can be understood more intuitively than those formulated in scripted syntax. While it offers almost all of the freedom that the Groovy syntax brings with it (see (Jenkins Pipeline Syntax Differences to Groovy) for limitations), it may require greater familiarity with Groovy. The decision for one style or the other can currently still be considered a question of taste; it is not foreseeable whether one of the two will prevail and ultimately supplant the other. That being said, more recent official examples are mostly written in declarative syntax and there is also a visual editor designed only for this. To enable readers a direct comparison, the examples provided in this article are formulated in both styles.
Key concepts
The description of a build pipeline with the Jenkins pipeline DSL can essentially be broken down into stages and steps. Stages are freely selectable groups of steps in a pipeline. Points 1. to 8. in the above sample pipeline could each represent one stage, for example. Steps are commands describing concrete build steps that are ultimately executed by Jenkins. One stage therefore contains one or more steps.
In addition to at least one stage with one step, a build executor must also be allocated for a minimum pipeline definition – so a Jenkins build slave, for example. This occurs in the agent section in declarative syntax and in the node step in scripted syntax. In both styles, labels can be used to describe the executor further in order to ensure that it fulfills certain conditions (e.g., makes a certain version of Java or a Docker© installation available).
Before setting up the first pipeline, we’ll first explain the different types of pipeline jobs that Jenkins offers:
- Pipeline: a simple pipeline job that expects script definition directly via the Jenkins web interface or in a
Jenkinsfilefrom the source code management (SCM). - Multibranch pipeline: enables specification of an SCM repository with several branches. If a
Jenkinsfileis found in a branch, the pipeline defined there will be executed in the event of changes to the branch. A Jenkins job is created on the fly for each branch. - GitHub organization: a multibranch pipeline for a GitHub organization or user. This job scans all repositories of a GitHub organization and creates a folder containing a multibranch pipeline for each of the repositories whose branches contain a
Jenkinsfile. So it is essentially a nested multibranch pipeline. See Cloudogu Open Source Jenkins, for example.
First steps
In order to familiarize yourself with the possibilities offered by the pipeline plugin, it’s a good idea to start with the simplest of setups. Create a project without a Jenkinsfile by defining the pipeline script directly in a pipeline job via the Jenkins web interface.
When getting started, it is important to be aware that for every type of pipeline job, links to documentation on the pipeline features available in the current Jenkins instance can be found on the Jenkins web interface. The basic steps (Jenkins Pipeline Basic Steps) available in all Jenkins instances can be complemented with additional plugins. If you click on pipeline syntax in the job, you will be directed to the Snippet Generator. There is also a universal link to this in every Jenkins instance.
The URL is https://jenkins-URL/pipeline-syntax.
Example: https://web.archive.org/web/20230508072209/https://oss.cloudogu.com/jenkins/pipeline-syntax
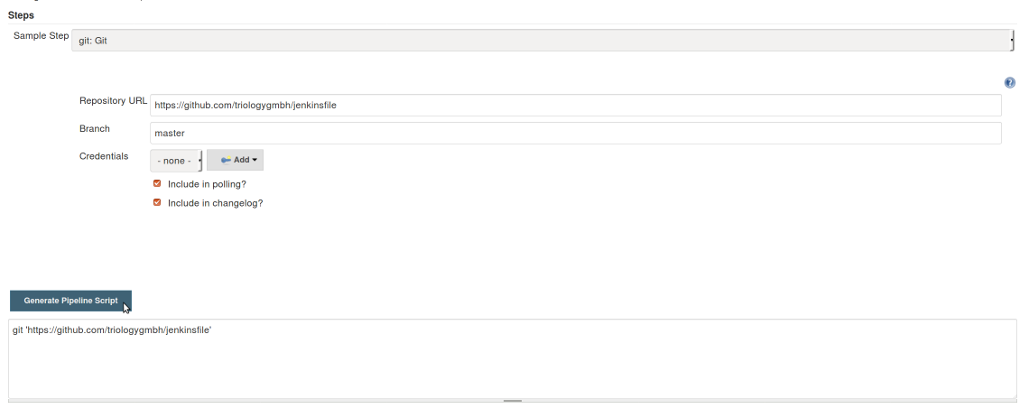
The Snippet Generator is a handy tool for the transition from previous Jenkins jobs that you “clicked together” to the pipeline syntax. Simply use the mouse to assemble your usual build job components here and generate a snippet in pipeline syntax (see Figure 1). You can also use the Snippet Generator later on to familiarize yourself with the syntax of new plugins, or if your IDE doesn’t have autocompletion. Speaking of autocompletion, the Snippet Generator contains further links to useful information:
- The global variables available for this instance. This includes environment variables, build job parameters and information on the current build job. Example:https://web.archive.org/web/20230508072209/https://oss.cloudogu.com/jenkins/pipeline-syntax/globals
- Detailed documentation for all steps and classes available for this instance, along with the associated parameters. Example: https://web.archive.org/web/20230508072209/https://oss.cloudogu.com/jenkins/pipeline-syntax/html
- An IntelliJ Groovy DSL script (GDSL) file to activate autocompletion.
See this blog post to find out how it works (Jenkins Pipeline Code Completion).
Pipeline scripts
With this knowledge, you can now begin writing pipeline scripts. The basic features of the Jenkins pipeline plugin will be described using a typical Java project. We’ll use the example of WildFly’s kitchensink quickstart, a typical JEE web app based on CDI, JSF, JPA, EJB, JAX-RS and integration tests with Arquillian, here. In declarative syntax, a minimal pipeline script to build this project in Jenkins looks as shown in Listing 1.
pipeline {
    agent any

    tools {
        maven 'M3'
    }

    stages {
        stage('Checkout') {
            steps {
                git 'https://github.com/cloudogu/jenkinsfiles'
            }
        }

        stage('Build') {
            steps {
                sh 'mvn -B package'
            }
        }
    }
}
Listing 1 The script shown in Listing 1
- allocates a build executor,
- obtains the Maven instance configured in Tools,
- checks out the default branch of the Git URL, and
- triggers a non-interactive Maven build.
The uniform structure of the declarative pipeline is shown here. Each pipeline is enclosed within a pipeline block, which is in turn comprised of sections and/or directives (Jenkins Pipeline Declarative Syntax). Among others, this reflects the stage and step concepts described above.
Listing 2 shows the pipeline from Listing 1 in scripted syntax:
node {
    def mvnHome = tool 'M3'

    stage('Checkout') {
        git 'https://github.com/cloudogu/jenkinsfiles'
    }

    stage('Build') {
        sh "${mvnHome}/bin/mvn -B package"
    }
}
Listing 2
The concept of stages can also be seen in the scripted syntax, though they then directly contain the steps and there aren’t any sections or directives. The terms nodes, tools, stages, git, etc., are referred to as steps here. This syntax allows significantly more freedom. Unlike declarative syntax that must always be enclosed within a pipeline block, steps in scripted syntax can also be executed outside of the node block. This makes clear why declarative syntax is a subset of scripted syntax: the pipeline block enclosing the declarative pipelines is essentially a step in the scripted syntax.
For these scripts to be executable on a Jenkins instance, a Maven installation with the name M3 simply needs to be created in Jenkins 2.60.2 on Linux in delivery state under “Global Tool Configuration.” This can then be defined and executed using the tools declarative or step in the pipeline job. In the background, specifying the M3 tool leads to Maven being made available on the current build executor. If necessary, it is installed and announced in the PATH.
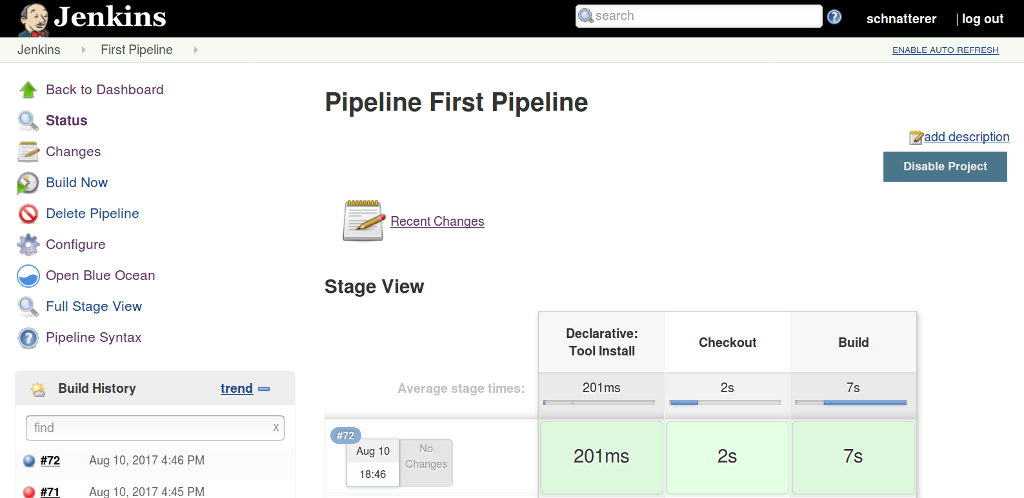
In the classic Jenkins theme, the build outcome is shown in a stage view detailing the stages and their times – as in Figure 2 below:
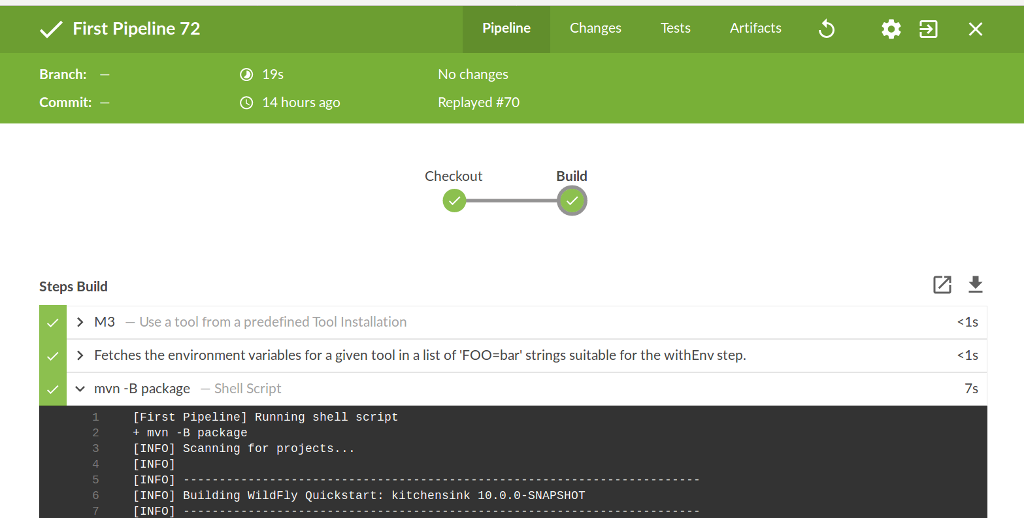
The official Jenkins theme Blue Ocean (BlueOcean) offers a view designed specifically for pipelines. The significantly more modern UX enables very straightforward work with pipelines. You are able to see at a glance which steps are executed during each stage and view the console log for specific steps at the click of the mouse, for example. There is also a visual editor for declarative pipelines (BlueOceanVisualEditor). If the plugin is installed, you can use links in each build job to switch between Blue Ocean and Classic. Figure 3 shows the pipeline from Figure 2 in Blue Ocean.
The first pipeline examples shown above will now gradually be expanded to illustrate basic pipeline features. Each of the changes will be shown in both declarative and scripted syntax. The current status of each extension can be tracked and tested in (Jenkinsfile Repository GitHub). There is a branch here containing the full examples in declarative and scripted syntax for each section under the number indicated in the heading. The outcome of the builds for each branch can also be viewed directly in our Jenkins instance (Cloudogu Open Source Jenkins (jenkinsfile)).
Conversion to SCM /Jenkinsfile (1)
One of the biggest advantages of Jenkins pipelines is that you can put them under version control. The convention is to store a Jenkinsfile in the repository’s root directory. The aforementioned pipeline job can then be converted to “Pipeline script from SCM” (see Figure 4) or a multibranch pipeline job can be created.

The URL for the SCM (in this case, Git) is configured in the job. You can check in the pipeline scripts as shown above, although the repository URL would then be repeated in the repository, which would violate the (Don’t Repeat Yourself!) principle. The solutions are different depending on the syntax:
- Declarative: the checkout is done in the
agentsection by default, meaning that the checkout stage can be completely omitted here. - Scripted: checkout is not done by default, however there is the
scmvariable containing the repository URL configured in the job as well as thecheckoutstep containing the SCM provider configured for the job (in this case, Git).
stage('Checkout') {
	    checkout scm
	}
Improving readability with your own steps (2)
Having Groovy as the basis for the pipeline makes it very easy to expand the existing steps. Running Maven can be expressed more clearly in this example by enclosing it in a separate method (see Listing 3).
def mvn(def args) {
    def mvnHome = tool 'M3'
    def javaHome = tool 'JDK8'

    withEnv(["JAVA_HOME=${javaHome}", "PATH+MAVEN=${mvnHome}/bin:${env.JAVA_HOME}/bin"]) {
        sh "${mvnHome}/bin/mvn ${args} --batch-mode -V -U -e -Dsurefire.useFile=false"
    }
}
Listing 3
This allows it to be called in both declarative and scripted syntax as follows:
mvn 'package'
Definition of the tools is moved to the method.
This move to a method means that Maven parameters useful to execution in Jenkins (batch mode, issue Maven version, update snapshots, issue failed tests on console) are separated from the Maven parameters of interest to the respective execution (here, the package phase). This enhances readability as only the key parameters are passed during execution. Furthermore, there’s no need to repeat the parameters, which should be given with every execution anyway.
A specific JDK is also used here. Similar to Maven, this requires installation of a JDK called JDK8 in the “Global Tool Configuration.” This makes the build more deterministic, though, as Jenkins’ JDK is not implicitly used but rather an explicitly named one.
This Maven method is taken from the official examples Pipeline Examples).
A method such as mvn is a good candidate for the move to a shared library. This will be described later in this article series.
Division into smaller stages (3)
Similar to when writing methods or functions in software development, small stages also make sense for the maintainability of pipeline scripts. This division will allow you to see at a glance where something has gone wrong with failing builds. The times are also measured by stage, whereby it can quickly be seen which parts of the build require the most time. The Maven build in this example can be subdivided into a build and unit test. Integration tests are run at this point for the first time, too. In this example, Arquillian and WildFly Swarm are used. Listing 4 shows how this is done in declarative syntax.
stages {
    stage('Build') {
        steps {
            mvn 'clean install -DskipTests'
        }
    }

    stage('Unit Test') {
        steps {
            mvn 'test'
        }
    }

    stage('Integration Test') {
        steps {
            mvn 'verify -DskipUnitTests -Parq-wildfly-swarm '
        }
    }
}
Listing 4
In scripted syntax, the steps sections are omitted.
One disadvantage worth mentioning here is that this will make the entire build slightly slower, as different Maven phases are completed in several stages. This has already been optimized here by only calling clean once at the start and the pom.xml is extended by a skipUnitTests property that prevents repetition of the unit tests during the integration test stage.
There is generally a danger of port conflicts during integration tests. The infrastructure may bind ongoing builds to the same ports simultaneously, for example, which will lead to unexpected build failures. This can effectively be avoided by using Docker© Technologies, which will be described later in this article series.
End of pipeline run and handling failures (4)
There are usually steps that must always be executed at the end of a pipeline run, regardless of whether the build was successful or not. The best example of this are test results. If a test fails, the build can also be expected to fail. However, the test results should be recorded in Jenkins in each case.
In addition, in the case of build failures or if the build status changes, a special reaction should occur. Sending emails is common here; chat messages or similar are another option.
In both cases, similar syntactic concepts are specified in pipelines. However, different approaches apply for declarative and scripted syntax.
In general, Groovy language features like try-catch-finally blocks are available in both cases. This is not ideal, though, as caught exceptions then don’t have any impact on the build status.
In declarative syntax, the post section with the conditions always, changed, failure, success and unstable is available here. This enables clear definition of what should happen at the end of each execution.
The above scenario can be depicted as shown in Listing 5.
post {
    always {

        junit allowEmptyResults: true,
testResults: '**/target/surefire-reports/TEST-*.xml, **/target/failsafe-reports/*.xml'
    }
    changed {
        mail to: "${env.EMAIL_RECIPIENTS}",
             subject: "${JOB_NAME} - Build #${BUILD_NUMBER} - ${currentBuild.currentResult}!",
body: "Check console output at ${BUILD_URL} to view the results."
    }
}
Listing 5
It is worth mentioning here that it is also possible to use the existing Jenkins email mechanism very easily. This is explained later in this section. The origin of the recipients’ email addresses is also relevant here. In the example, these are loaded in the EMAIL_RECIPIENTS environment variable. This must be determined by an administrator in the Jenkins configuration. Alternatively, you can of course also write the recipients directly in the Jenkinsfile. They will also be checked into the SCM then though.
In scripted syntax, only the catchError step is available that essentially works like a finally block. To depict the above scenario, you’ll need to work with if conditions. For reasons of maintainability, we also recommend defining an individual step here (see Listing 6).
node {
    catchError {
        // ... Stages ...
    }

    junit allowEmptyResults: true,
            testResults: '**/target/surefire-reports/TEST-*.xml, **/target/failsafe-reports/*.xml'
    statusChanged {
        mail to: "${env.EMAIL_RECIPIENTS}",
                subject: "${JOB_NAME} - Build #${BUILD_NUMBER} - ${currentBuild.currentResult}!",
                body: "Check console output at ${BUILD_URL} to view the results."
    }
}
def statusChanged(body) {
    def previousBuild = currentBuild.previousBuild
    if (previousBuild != null && previousBuild.result != currentBuild.currentResult) {
        body()
    }
}
Listing 6
As previously mentioned, the subject of emails can be simplified in both declarative and scripted syntax by using the existing Jenkins email mechanism. The familiar “Build failed in Jenkins” and “Jenkins build is back to normal” emails will be sent here. The Mailer class will be used for this for which there is no dedicated step. This is possible via the generic step step. If you also wish to receive “Back to normal” emails, you will need to note one particularity: the Mailer class reads the value from the currentBuild.result variable. In case of success, this will be placed right at the end of the pipeline. Meaning that the Mailer class will never learn of this. Implementation as a separate step is therefore advisable here. In scripted syntax, this can be realized as shown in Listing 7. The same solution can also be used with declarative syntax though.
node {
    // ... catchError und nodes
    mailIfStatusChanged env.EMAIL_RECIPIENTS
}

def mailIfStatusChanged(String recipients) {

    if (currentBuild.currentResult == 'SUCCESS') {
        currentBuild.result = 'SUCCESS'
    }
    step([$class: 'Mailer', recipients: recipients])
}
Listing 7 With regard to notification with HipChat, Slack, etc., we recommend reading the following Jenkins blog entry: (Jenkins Notifications).
Properties and archiving (5)
Countless more minor settings are available for conventional Jenkins jobs, which can be executed via the web interface. These include the size of the build history, prevention of parallel builds, etc. These are of course described in the Jenkinsfile if the pipeline plugin is used. In declarative syntax, these settings are known as options and structured as depicted in Listing 8.
pipeline {
    agent any

    options {
        disableConcurrentBuilds()
        buildDiscarder(logRotator(numToKeepStr: '10'))
    }

    stages { /* .. */ }
}
Listing 8
In scripted syntax, the options are known as properties and are set using the step with the same name (see Listing 9).
node {
    properties([
            disableConcurrentBuilds(),
            buildDiscarder(logRotator(numToKeepStr: '10'))
    ])

    catchError { /* ... */ }
}
Listing 9
Another useful step is archiveArtifacts. This saves artifacts created during the build (JAR, WAR, EAR, etc.) so that they can be viewed in the Jenkins web interface. This can be useful for debugging or to archive versions if you don’t use a Maven repository. In declarative syntax, it is formulated as shown in Listing 10.:
        stage('Build') {
            steps {
                mvn 'clean install -DskipTests'
                archiveArtifacts '**/target/*.*ar'
            }
        }
Listing 10
In scripted syntax, the steps sections are omitted. This saves all JARs, WARs and EARs generated in one of the Maven modules.
Tips for getting started
There are a few other basic directives such as parameters (declared build parameters) and script (to execute a block in scripted syntax within the declarative syntax) – we recommend reading the information on (Jenkins Pipeline Declarative Syntax). There are also many other steps, most of which are made available via plugins – see the official documentation (Pipeline Steps Reference). For these to be available in the pipeline, developers must use the according API. The pipeline compatibility of individual plugins is summarized here (Pipeline Compatibility). At the current time, most of the common plugins support the Jenkins pipeline plugin.
We also recommend reading the Top 10 Best Practices for Jenkins Pipeline Plugin (Pipeline Best Practices).
And now for a few handy tips on working with the Jenkinsfile. When you first set up a pipeline, we recommend you start with a normal pipeline job and only add the Jenkinsfile to version control when the build works. You otherwise run the risk of bloat your commit history.
Use the “Replay” feature when making changes to an existing multibranch pipeline. This temporarily enables editing for the next execution of the pipeline without changes being made to the Jenkinsfile in the SCM. One final tip: you are also able to view the workspace in the Jenkins web interface for pipelines. The agent section or node step allows you to allocate several build executors. This is described in greater detail with the subject of parallelism later in this article series. There can therefore also be several workspaces. These can be viewed in the classic theme:
- Click on “Pipeline Steps” in a build job.
- Click on “Allocate node: Start”.
- The familiar “Workspace” link will appear on the left-hand side.
Conclusion and outlook
This article provides insights into the basics of the Jenkins pipeline plugin. It describes the key concepts and terms as well as the different types of jobs, provides an introduction to the Jenkinsfile syntax in theory and by using examples, and offers practical tips for working with pipelines. If the Continuous Delivery pipeline described at the start of this article is taken as the common theme, then this article ends at 5.. The example described configures Jenkins, builds the code, runs unit and integration tests, archives test results and artifacts, and sends emails. All with a script of around thirty lines in length.
With regard to Continuous Delivery, steps such as static code analysis (e.g., with SonarQube) as well as deployments on staging and productive environments are of course missing here. A number of tools and methods can be used to implement these, such as nightly builds, reuse in different jobs, unit testing, parallelism, and Docker© technologies.
This will be described later in this article series.
+++ You can download the original article (German), published in Java Aktuell 01/2018.+++
Individual consulting services
Create the optimal framework for first-class software development in your company – with Cloudogu.
Request consulting
This article is part 1 of the series „Jenkins Pipeline for continuous delivery“.
Read all articles now:


