


06/18/2019
in Technology
Let’s roll up our sleeves and backup!
Table of Contents
Backup: Does it spark joy?
The word “data backup” does not invoke much cheering and rejoicing for many people. This series of articles about the “restic” software package shows that this does not have to be the case. Restic simplifies many aspects of backup and restore to a great enough extent that you can focus on the most essential part: The underlying system structure.
This series of articles describes how to configure restic and back up data. The second part of the series will deal with the restoration of data and clearing out old backups. There is one thing that the author is sure of: The queen of tidying up Marie Kondō (“Does it spark joy?”) would be right at home with restic.
To illustrate the relationship, one host system and two Docker containers are used: One container is used to simulate a remote backup medium and another container is used to represent the payload of a container whose data being backed up (more on this later).
Design goals
When you first lay your eyes on it, restic already provides a structured impression. The home page makes the following claim for its software: “Backup done right”, a motto that seems about right to the author. The background of this is provided by the past of computing: As system complexity increases, we are quickly overwhelmed by the subject, especially when we do not have a controlled way of approaching it. Restic helps you overcome this problem by offering simplicity and speed. The software does not support overly complex backups. Restic relies on simple command syntax, stable data structures and a simple configuration.
Since the software at the same time avoids backups that take too long to perform, speed is another design goal. The software is able to perform quick backups by first generating checksums of the data that is being backed up. This data is transferred to a so-called repository, which is the storage location of the backup. However, this only occurs for the parts of the backup set that have not yet been backed up. This allows for data deduplication. Only rarely does a system state completely differ from a later system state. Restic takes advantage of this fact and also determines this before a data package is stored in the repository.
Almost more important than the backup itself is the ability to restore backups. Wishful thinking that a backup can be restored is a bad practice here, because a backup is only useful if all backed up data is recoverable. The only way to do this is to incorporate the verification of the backed-up data into the work flow. Again, simplicity is king, as will be shown later in the section dealing with restoration.
One nice feature of backing up with restic is the included encryption, which is even enabled by default. In times of potentially insecure storage in the cloud, this is an absolute plus since the initial process step of encrypting data is often not practiced in favor of industry-standard encryption. In order to perform this encryption, the package establishes connections by default to relevant storage locations, such as SFTP, S3 or the local file system.
Installation
Restic can be obtained from many sources. You can either download it from GitHub, install a package using one of the major Linux package managers, install a Docker image or you can compile it yourself in Go (thanks to cross compiler support the installation of Go is very easy). The software also supports a variety of operating systems. In order to illustrate the procedure, in this article the web server nginx will deliver static web pages that should be backed up. Later we will illustrate how these pages can be backed up and then restored using restic.
Since we will be working with Docker in this article, it will be assumed that the user is working with root privileges so that the Docker volumes will be able to be read later. However, this is not a hard requirement for working with restic.
How do you use restic?
Like many programs in the realm of cloud technology, restic accepts commands in order to perform certain actions. These are command-line parameters that modify restic’s functionality depending on the use case. These commands accept or require arguments. Restic can provide you with more information on which arguments are accepted at each command level using the --help argument, e.g., restic --help or restic backup --help
For this article, we are interested in the following commands:
initto create a backup repository,snapshotsto view existing backups,backupto back up files and directories
Configuring the backup directory
Before we start backing up, we should briefly explain some basic behaviors and concepts.
The restic repository is the place where the encrypted backup is stored. If an attacker got hold of this data, he would not be able to do anything with it because of the encryption.
Restic abstracts individual backup operations into snapshots, which can be backed up at the same time. For example, if you want to back up the /etc/ path, several files can be stored at the same time in a snapshot in the repository. Each snapshot has a unique snapshot ID that can be used to access this snapshot. In addition, it is possible to assign tags to snapshots to group or filter snapshots for your own work.
In what follows, we will use the S3 protocol to map a backup to AWS or Google Buckets. The configuration for this consists of only four environmental variables. Alternatively, you can also use command line arguments. However, this is rather uncommon, especially in the cloud context, where we increasingly work with transitory environmental variables. These environmental variables can then later be passed to the container via the host. To be able to use Docker trouble-free, we grant the shell root privileges. This root shell will be used throughout the following examples.
sudo su

export AWS_ACCESS_KEY_ID="AKIAIOSFODNN7EXAMPLE"
export AWS_SECRET_ACCESS_KEY="wJalrXUtnFEMI/K7MDENG/bPxRfiCYEXAMPLEKEY"
export RESTIC_REPOSITORY="s3:http://127.0.0.1:9000/backuprepo"
export RESTIC_PASSWORD="3 weird tricks to gain Ops attention..."
The next step is to create the repository. For testing purposes, a developer-friendly replacement is needed that can be an AWS S3 bucket or Google Bucket in the production environment. This can be done using the MinIO object storage server, which is compatible with AWS S3. The usual naming rules apply to the name of the S3 bucket. Alternatives to this are mentioned in the second post of this series.
Please note: The backup data stored in the container is also deleted when the container is deleted.
docker run --detach -p 9000:9000 --name minio \
  -e "MINIO_ACCESS_KEY=${AWS_ACCESS_KEY_ID}" \
  -e "MINIO_SECRET_KEY=${AWS_SECRET_ACCESS_KEY}" \
  minio/minio server /data
# Wait until the container reports back as healthy
Now the restic repository can finally be initialized. Since all of the environmental variables are already set, restic knows where the repository is and which key should be used to encrypt it.
restic init
created restic repository 00d7d2bb57 at s3:http://127.0.0.1:9000/backuprepo

Please note that knowledge of your password is required to access
the repository. Losing your password means that your data is
irrecoverably lost.
The restic repository is now ready to be used. The first backup can be started. In order for us to have some data to back up, we create a simple web page as pseudo content in a Docker volume. This web page will be delivered by nginx at ‘http://localhost:8080’. This content is just an example of all of the user data that can be stored in a container.
docker volume create nginxData
# erzeugt aus der restic manpage eine HTML-Seite
docu=$(man restic) && echo "<pre>${docu}</pre>" | tee /var/lib/docker/volumes/nginxData/_data/index.html
docker run --name prod-nginx -v nginxData:/usr/share/nginx/html:ro -p 8080:80 -d nginx
Back up
Once you have initialized your restic repository, you can now immediately start backing up files and directories. However, on the one hand, restic must be able to access the files and directories in order to back them up. On the other hand, the backup must not itself be corrupted. This could happen if a container writes to several files sequentially but this transaction is interrupted before it is finished, thereby corrupting the backup.
In order for the backup to be properly executed, the following must happen:
- Stop the container
- Back up the volume(s)
- Start the container
For an nginx container that has been freshly filled with data from the volume, the procedure would look like this:
docker stop prod-nginx
prod-nginx

restic backup /var/lib/docker/volumes/nginxData
repository 00d7d2bb opened successfully, password is correct

Files:           3 new,     0 changed,     0 unmodified
Dirs:            4 new,     0 changed,     0 unmodified
Added to the repo: 0 B

processed 3 files, 4.986 KiB in 0:00
snapshot 40b3ab4c saved

docker start prod-nginx
prod-nginx
Use ‘restic snapshots’ to show the created snapshots.
Now it’s time to look at the actual conditions.
Considering the need for practicality in the area of backups
Backing up and restoring data can be a painful process for a variety of reasons: It can be caused by the uncertainty of whether data can be restored. But the complexity of a computer system with both open and locked files or that allows simultaneous write accesses often complicates this task for a willing administrator.
In order to solve the latter problem, the first step is to identify and decouple dependencies, which is something that is already performed in the Docker environment. Containers already perform their own decoupling. In order to be started and stopped quickly, the data in the container must not be directly present in the container, but must be stored there via volumes (see info box at the end of this post). To avoid possible write access and other types of file locking, all containers accessing this volume should now be stopped.
This still leaves the host system, where files that are open could possibly be kept. If this is the case, a mechanism should be established to selectively stop and re-authorize access to the data being backed up. Since how such a mechanism is configured differs from system to system, we will not elaborate on it in this series of articles.
If several containers are technically dependent on each other, such as an application and a Postgresql database, then they must be backed up in the correct order and in accordance with their own standards. Postgresql may use other backup mechanisms, for example, than nginx when working with static HTML files.
It will be interesting if several functional parts of a backup process are technically separated in two different Docker containers. Both containers will have volumes for data storage. If only one of the two volumes is restored in such a configuration, then an inconsistency between both containers is likely to occur.
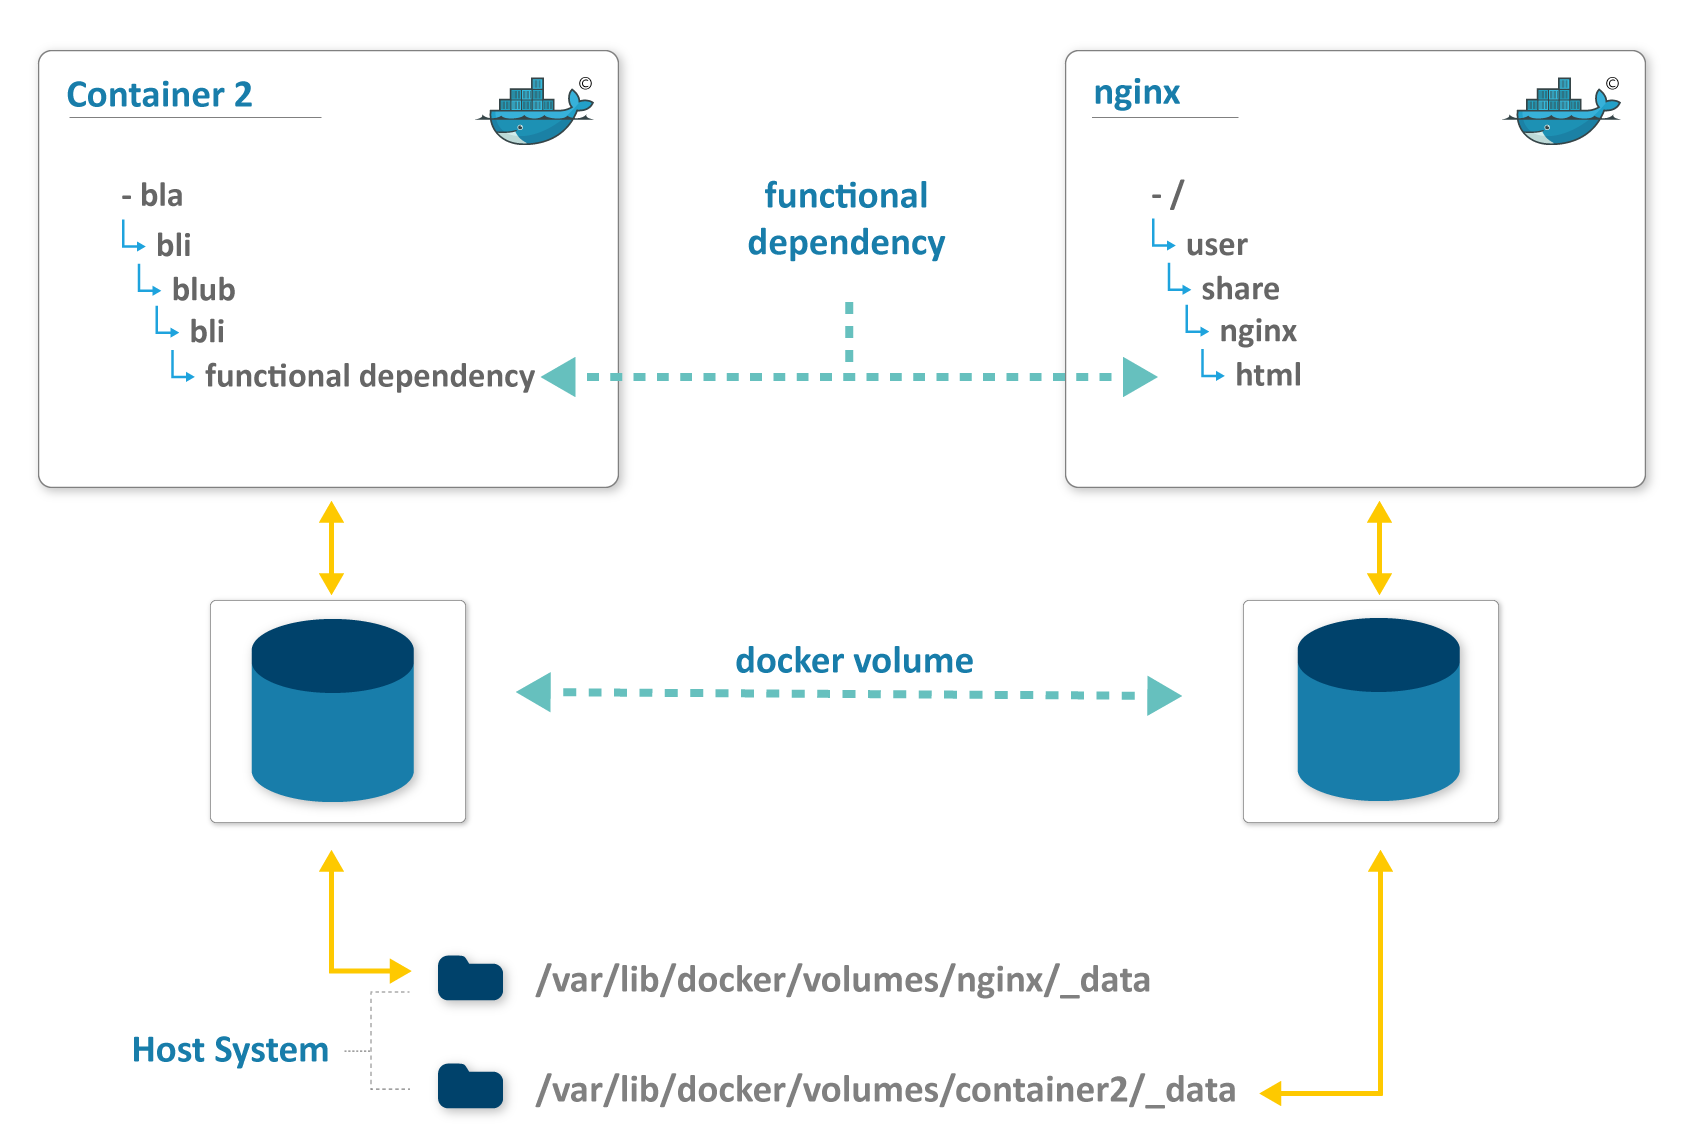
In this case, there is only a functional dependency between the two containers. A logical solution is to also map this dependency during the backup and restoration processes:
- Shut down both containers
- Back up both volumes
- Start up both containers again
A tidy house, a tidy mind
Once the backup is successfully completed, the desire quickly follows to contextualize the backup. In this case, the same day can be set for different snapshots in order to express the above functional dependency. In addition, it is possible to assign multiple tags to a snapshot.
restic backup /var/lib/docker/volumes/nginxData --tag "complete backup CW16"
restic backup /var/lib/docker/volumes/container2 --tag "complete backup CW16"
This can also be seen in the snapshot overview:
restic snapshots
repository 00d7d2bb opened successfully, password is correct
ID        Date                 Host          Tags                     Directory
-------------------------------------------------------------------------------------------------------------
d7e6092d  2019-04-12 15:52:32  MY-HOST-1337  complete backup CW16  /var/lib/docker/volumes/nginxData/_data
dd6ad91c  2019-04-12 15:54:57  MY-HOST-1337  complete backup CW16  /var/lib/docker/volumes/container2/_data
-------------------------------------------------------------------------------------------------------------
2 snapshots
We’re all just containers in the wind
A container represents an instantiated image. The ideal container must be small, fast and stateless so that the container is expendable. This offers a multitude of advantages for the distribution of images as well as the rollout. Small images can be obtained quickly, such as, for example, if a container being created from a new image, but the image is not yet cached.
It is important for the purposes of backup and restoration that the container not have a state. Otherwise, this would significantly hinder the expendability of the container, if, for example, the container is simply gotten rid of. As a result, the image size is noticeably increased and the I/O efficiency drops considerably (see < rel="noreferrer" target="blank" title="Docker Best Practices" href="https://docs.docker.com/develop/dev-best-practices/">Docker Best Practices</a>).
Therefore, the data used must be stored externally. This can be done via container volumes or by making calls to a database. The database then has to store the DB data on the host to meet the same requirements for a container.
The container itself does not have to be backed up because it is already in the repository from which the container image was obtained. If the container image repository is not backed up, as is the case with Docker Hub or AWS ECR, this can also be done via the mechanism that is presented here.
Visit our community platform to share your ideas with us, download resources and access our trainings.
Join us now

