


12/06/2013
in Technology
Permission Management with LDAP Groups
Table of Contents
+++This post was migrated from our former blog about SCM-Manager Universe. Therefore, the design is slightly different and some information might not be 100% applicable to Cloudogu EcoSystem. So don't be alarmed; enjoy reading.+++
After you downloaded SCM-Manager Universe the permission management for the development tools is based on individual user permissions. Since there seems to be a great interest in using group based permission management we want to show you how. We will show which modifications you have to perform in the tools and how you can handle groups.
Hint: The configuration discribed in this post applies to all SCM-Manager Universe versions older than 14.5 – Capella. From Capella on groups are configured by the CAS server, hence the configuration is different.
LDAP Groups in General
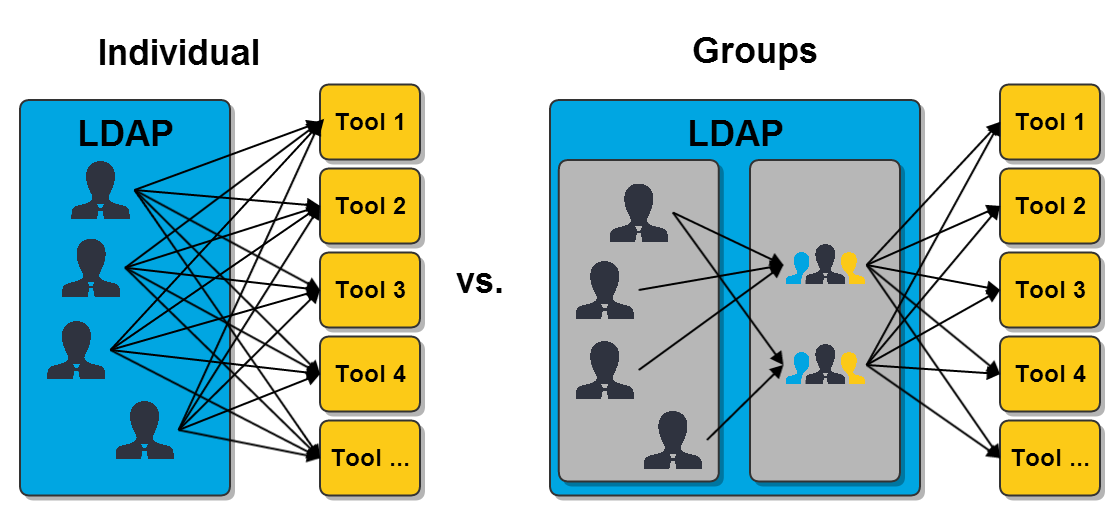
In contrast to user individual permissions in tools it is possible to grant permissions to whole LDAP groups. The usage of groups can reduce the work for assigning permissions to users a lot, depending on the number of users and their fluctuation. The following image illustrates the number of necessary allocations.
If you want to use group permissions you have to decide whether you want to use static or dynamic groups: In dynamic groups you are adding group attributes to the users. It is not necessary to define those groups elsewhere. Whereas for static groups you create groups to which you add the members as attributes.
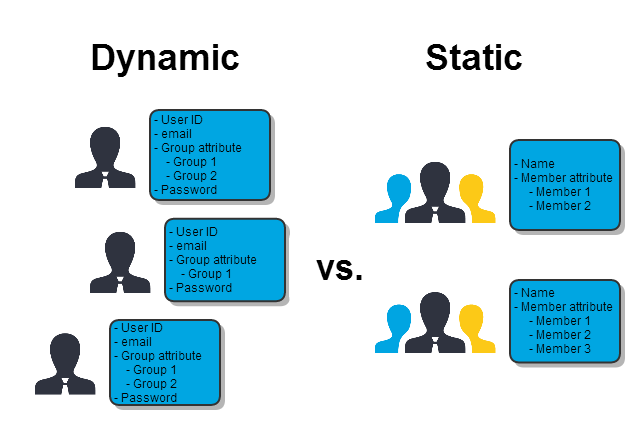
In most cases it is simpler to administrate static groups, because you can manage the members centrally. All members of a group can be seen in one screen, it is not necessary to create a filter and suchlike. Therefore we will show you how to change the permission management by using static groups and demonstrating what you need to change in the tools.
Configuration of phpLDAPadmin
In the LDAP management tool you have to add the groups you want to use. We recommend to create an organizational unit for groups first and then add the groups there. This could look like this:
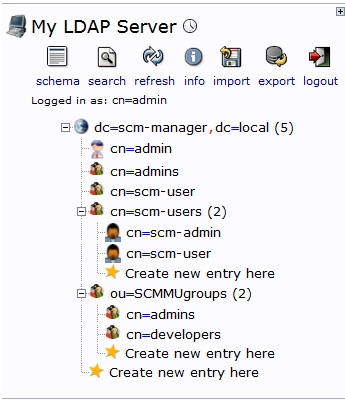
In this case we created the organizational unit SCMMUgroups. There we added two groups: admins and developers. The template of the groups should be “Generic: Posix Group”.
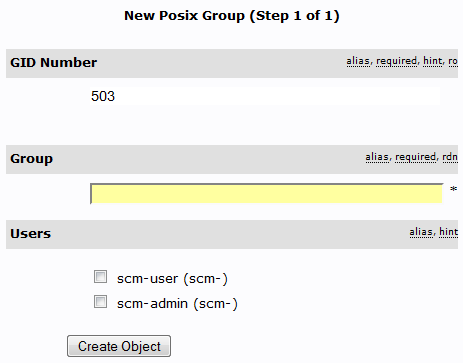
It is mandatory to provide a name for the group and you can select the members from all LDAP users. After the group was created you can easily edit the members by picking them from a list. Once you have created all the groups you need and you have added the members to them you are finished with the preparations in phpLDAPadmin. In the following you will see how the configure the tools to use your groups.
Configuration of SCM-Manager
In SCM-Manager you can edit the LDAP configuration in the “Config → General” screen. There you have to modify the configuration to look like this by editing the highlighted fields:
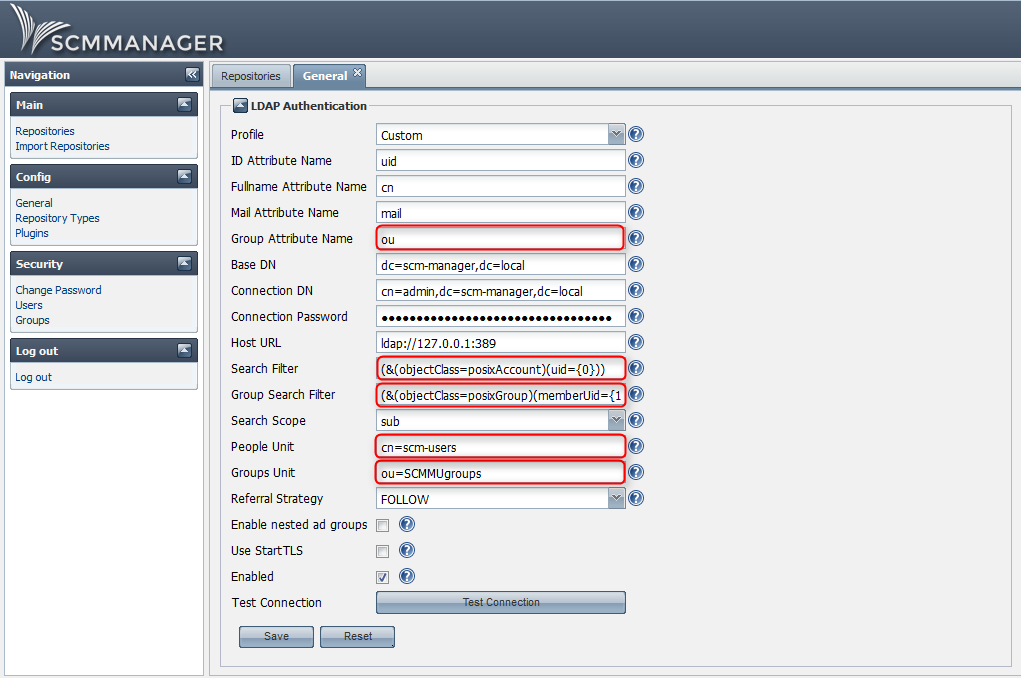
- In the fields “People Unit” and “Group Unit” you have to provide the names of the two organizational units you use.
- The field “Group search filter” contains the following string: “
(&(objectClass=posixGroup)(memberUid={1}))”
Usage
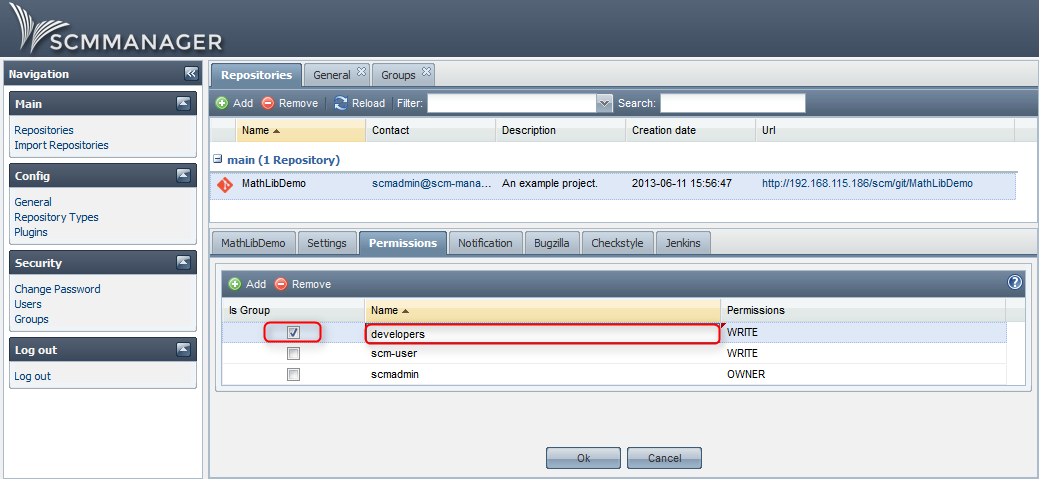
After you configured the LDAP plugin you can start providing permissions to the groups. In SCM-Manager you can’t provide administration rights to groups, but you can provide permissions to repositories. It is not necessary to add LDAP groups to SCM-Manager, you simply have to add the groups at the “Permissions” tab on the “Repositories” screen. Don’t forget to check the “Is Group” box.
Configuration of Jenkins
In Jenkins you can configure the LDAP connection in the “Manage Jenkins → Configure Global Security screen. Modify the configuration to look like this:
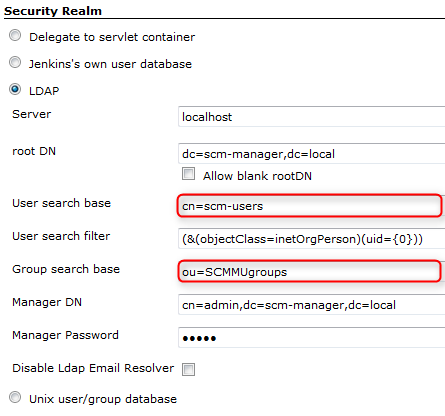
Provide your specific entries in the fields “User search base” and “Group search base”.
Usage
In the same screen as the LDAP configuration, “Configure Global Security”, you can provide permissions. At “Authorization” you can add a new group for “Matrix-based security” simply by typing the name of the group and clicking “Add”.
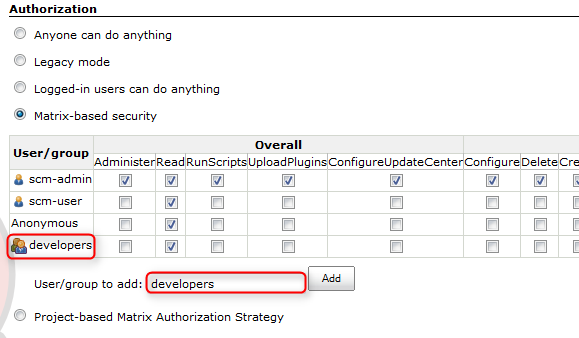
The image shows that the new group “developers” was detected as an LDAP group by Jenkins: the row starts with the group symbol. If there was a misspelling, a “forbidden” symbol would be displayed. It is also possible to use one of the other authorization methods.
Configuration of Sonatype Nexus
In Sonatype Nexus you can modify the LDAP configuration in the “Security → LDAP Configuration” screen. The modifications need to be done in the two displayed sections. Then you have to configure Nexus to look like this by modifying the highlighted fields:
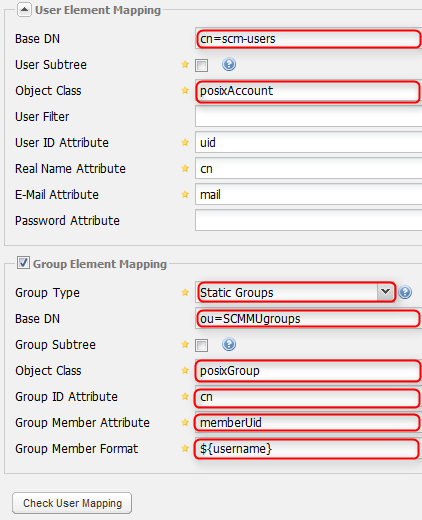
The two fields “Base DN” need to contain the names of your specific organizational units. If you click “Check User Mapping” after you filled in the fields you will get an error message, because until now there is no mapping between the LDAP groups and Sonatype Nexus roles. The mapping is done in the “Security → Roles” screen. There you click “Add” and select “External Role Mapping”. A popup shows up:
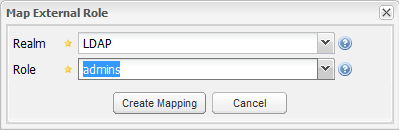
Select the realm LDAP and if you click at the role-dropdown you will see a list of all your LDAP groups. Select one of them and click “Create Mapping”.
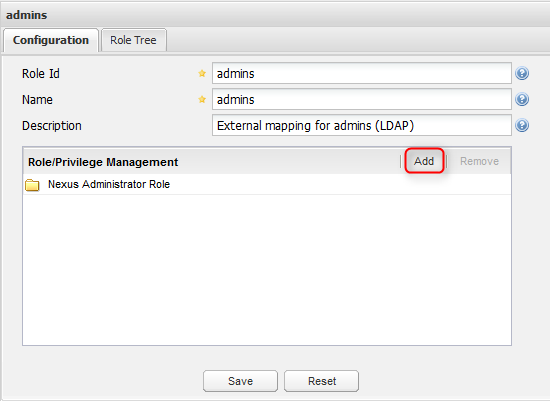
Usage
After the role was created it is in the list. The only thing that is missing now are the permissions: select the role and add the corresponding roles to it.
After you mapped all your LDAP groups with Sonatype Nexus roles you are finished with configuring this tool.
Configuration of SonarQube
In SonarQube you can’t configure the LDAP connection via web interface. You have to modify the sonar.properties file. In order to do that follow these steps:
- Go to the terminal of your SCM-Manager Universe, e.g. in your VM-Player.
- Log in as admin
- Enter this command:
sudo nano /usr/share/tomcat7/.sonar/conf/sonar.properties - Provide the password
- Go to the end of the text, to “LDAP Configuration”, and modify the section to make it look like this:
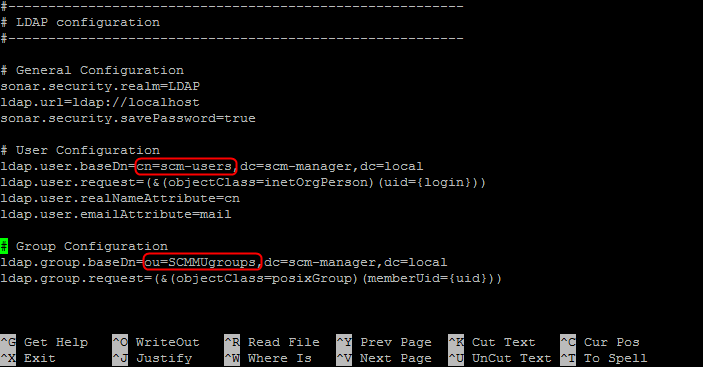
- Don´t forget to delete the “#” tokens at the beginning of the two last lines and provide the names of your organizational units.
- Save the file by pressing “Strg + x”
- Confirm that you want to save the file by pressing “Y” and after that pressing “Return”
- Reload the /sonar application in the Tomcat manager web interface
Now the configuration is finished. The only thing that is left to do is to add the groups in SonarQube.
Usage
In order to make the group permissions work you have to add new groups to SonarQube in the “Settings → Security → Groups” screen. Make sure that the group names match your LDAP group names. After you created the groups you can grant permissions to them in the “Roles” and “Administrators” screens. When you are finished with that users can log in to SonarQube with the right permissions.
Conclusion
After you performed the modifications described in this post you can manage permissions to all the development tools of SCM-Manager Universe in phpLDAPadmin. The only thing you have to do is to add or delete members of groups, you don´t have to provide permissions in each user in each tool individually anymore. Depending on the structure of your organization the best suitable groups are varying.
With kind regards, your SCM-Manager Support Team
SCM-Manager
The easiest way to share and manage your Git, Mercurial and Subversion repositories.
Getting started

