SCM-Manager Plugins – Redmine
SCM-Manager can be connected to several issue tracking applications like Bugzilla or JIRA©. The basic functionality of those connections is the same: You can change the status and add comments to issues by using keywords in your commit messages. In this post we will show you how to use the scm-redmine-plugin to connect SCM-Manager to the popular open-source issue tracker Redmine and thus improve your documentation.
Redmine Plugin
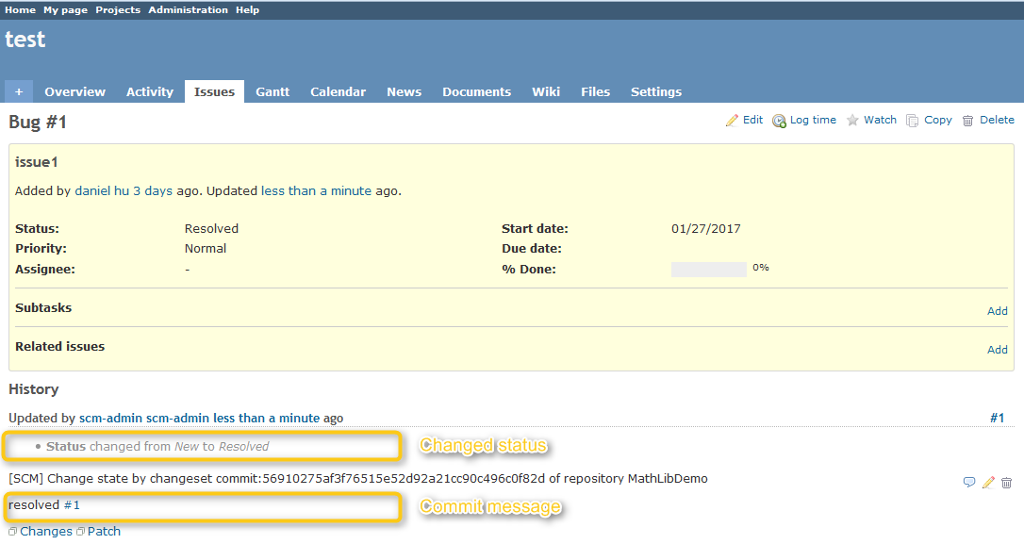
The scm-redmine-plugin allows you to add commit messages as a comment to issues in Redmine. To use the functionality you simply have to use #issueId in your commit messages to add the commit message as a comment to the issue. If you want to change the state of an issue you have to use the name of the desired state in the commit message. If there is a state named In Progress the issue will be set to this state if you use In Progress in you commit message. A commit message could for example look like this: “Started working on issue ‘#4711’, now in progress”.
Configuration
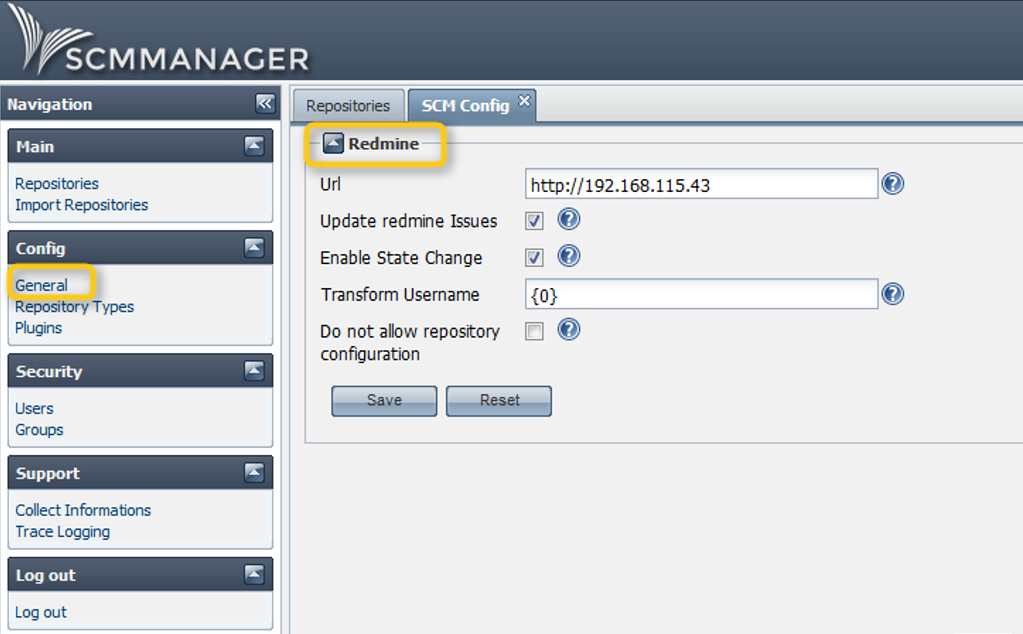
Since version 1.5 of the plugin there is a global and a repository specific configuration available. If repository specific configurations are allowed, the global configuration will be used for all the repositories that don’t have a specific configuration.
Field Annotations
| URL: | This URL specifies the location of the Redmine instance that SCM-Manager is supposed to communicate with (e.g. https://yourDomain/redmine). The URL needs to be a fully qualified domain name or IP-address. |
| Update Redmine Issues: | Set this option to true to enable SCM-Manager to add comments to specified Redmine issues. To use this feature you need to use #issueId in commit messages. Sample commit message: "implemented basic functionality of #4711" |
| Enable State Change: | Set this option to true to enable SCM-Manager to change the state of issues. To use this option it is required to use the names of the desired target state in the commit message. Sample commit message: "started working on #4712" (If there is a state named "started" the issue #4712 will be set to this state). |
| Transform Username: | Depending on the authentication mechanism you use for Redmine you can specify whether the scm-redmine-plugin uses the name, e-mail address or display name for authentication. No matter which attribute you use for authentication, the users password has to be identical in Redmine and SCM-Manager. For that reason it is recommended to use an LDAP server for both applications. |
| Do not allow repository configuration: | Set this option to true to disable a repository specific configuration. If the option is set to inactive the global configuration is used for all repositories that don't have an individual configuration. |
Redmine Configuration
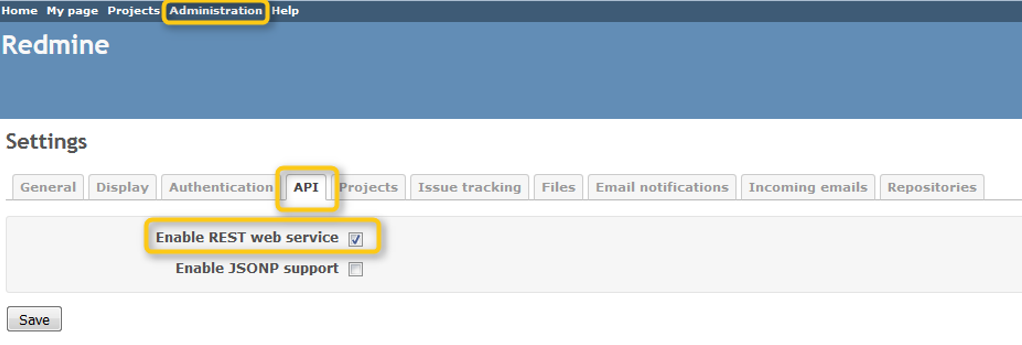
In Addition to the configurations in SCM-Manager, you have to make sure that API-access to Redmine is enabled. Otherwise SCM-Manager can’t add comments or change the status of issues. API-access can be activated in the Redmine administration.
Select API in the Settings and check the option Enable REST web service. After you did that all configurations are done and you can enjoy the new feature.
Automated issue documentation
If you now use #issueId and keywords in your commit messages, the issues in Redmine will be updated automatically.
Hint: You can only use 1 issueId per commit message. If you use more, only the last ID mentioned will be updated.
The scm-redmine-plugin allows you to modify issues by using keywords in your commit messages. If you use different usernames in SCM-Manager and Redmine you can set the authentication to email-address or display name, but the password has to be the same in both applications. The possibility to easily add comments to issues and to change their status, can improve the documentation significantly and provide a better overview for the project manager.
Redmine and Cloudogu EcoSystem
If you want to test this feature on your own, you can install your own EcoSystem or simply get an appointment for a live demonstration with us.
Get your personal product demonstration with us. In only 30 minutes we will answer all your questions and show you the installation and operation of the Cloudogu EcoSystem.
Note: On Oct. 18th we adapted the post to Cloudogu EcoSystem


