


11/08/2021
in Technology
SCM-Manager – How to start my first plugin?
Table of Contents
This article is part 2 of the series „Introduction to plugin development for SCM-Manager“
Read the first part now.
In the previous post we explained why and how plugins can be used to extend SCM-Manager’s basic functionality, what the basic architecture looks like and how you can share plugins you developed with the community. In this post we will show you how to create a plugin from scratch by developing the backend for a new plugin.
Our plugin idea
Some time ago SCM-Manager users expressed the wish to add own links to SCM-Manager, e.g. for an imprint or the related issue-tracker system. These links should be configurable and must be available from any page in SCM-Manager. That is why we decided use the creation of the Custom-links plugin as an example for how to write plugins for SCM-Manager. It consists of a backend store to persist the data, a REST-API resource, a front-end configuration page in the admin area and an extension to display our links in the footer of SCM-Manager.
Bootstrap for our plugin
First, we need to set up our plugin. We use create-plugin.scm-manager.org and fill in the required information.
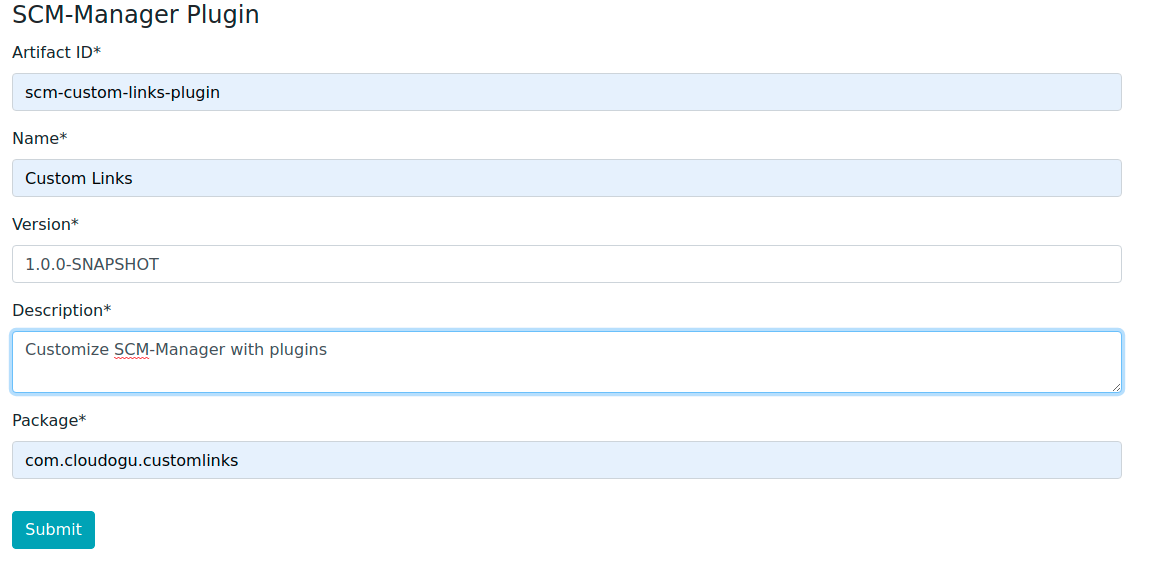
After submitting, we will receive a package with the basic structure of our plugin that we need to start with.
General Notes
- SCM-Manager is licensed under the MIT license. Therefore, almost every file must contain a valid license header. If you encounter errors regarding your license headers, try
./gradlew licenseFormatto fix this automatically. - We strongly recommend writing unit tests for any logic you implement. If you are having trouble creating unit tests or are looking for best practices, you can check here or other SCM-Manager plugins.
Set up our IDE
For plugin development, we use IntelliJ IDEA with the following settings: IDE Configuration
Especially the topics licenses and formatting can easily distract from the actual tasks and should therefore be automated if possible.
Data persistence
Coding time. We create a data object that represents our single custom link entity. In our case, two fields for name and url should suffice.
This object needs to be serializable since we want to store it. So we add some getters, setters and two constructors.
Hint: You can also use the Lombok annotations like @Getter or @NoArgsConstructor.
public class CustomLink {
  private String name;
  private String url;

  CustomLink() {
  }

  public CustomLink(String name, String url) {
    this.name = name;
    this.url = url;
  }

  public String getName() {
    return name;
  }

  public void setName(String name) {
    this.name = name;
  }

  public String getUrl() {
    return url;
  }

  public void setUrl(String url) {
    this.url = url;
  }
}
Since we know what our data will look like, let’s create a store to persist these custom links.
SCM-Manager provides different types of storage such as data stores, configuration stores, and blob stores.
For our use case, we chose the ConfigurationEntryStore.
This store can manage multiple custom links independently. Our store consists of three public methods getAllLinks, addLink and deleteLink.
package com.cloudogu.customlinks;

import com.google.common.annotations.VisibleForTesting;
import sonia.scm.store.ConfigurationEntryStore;
import sonia.scm.store.ConfigurationEntryStoreFactory;

import jakarta.inject.Inject;
import java.util.Collection;

public class CustomLinkConfigStore {

  @VisibleForTesting
  public static final String STORE_NAME = "custom-links";

  private final ConfigurationEntryStoreFactory configurationEntryStoreFactory;

  @Inject
  public CustomLinkConfigStore(ConfigurationEntryStoreFactory configurationEntryStoreFactory) {
    this.configurationEntryStoreFactory = configurationEntryStoreFactory;
  }

  public Collection<CustomLink> getAllLinks() {
    return getStore().getAll().values();
  }

  public void addLink(String name, String url) {
    //TODO Manage links permission
    getStore().put(name, new CustomLink(name, url));
  }

  public void removeLink(String name) {
    //TODO Manage links permission
    getStore().remove(name);
  }

  private ConfigurationEntryStore<CustomLink> getStore() {
    return configurationEntryStoreFactory.withType(CustomLink.class).withName(STORE_NAME).build();
  }
}
Now we can already persist data in the internal SCM-Manager data storage. The stored data from our plugin might look like this:
<?xml version="1.0" ?>
<configuration type="config-entry">
  <entry>
    <key>Imprint</key>
    <value>
      <name>Imprint</name>
      <url>https://scm-manager.org/imprint</url>
    </value>
  </entry>
</configuration>
Permissions
Before we move on to the REST-API, let’s take a look at permissions. SCM-Manager uses Apache Shiro to handle permissions. Each logged-in user is a subject that is granted permissions. For our use case, we want each user to be able to see custom links, even if they are not logged-in. But only authorized users can change the custom links.
So we create a PermissionCheck class.
This class introduces a new permission manageCustomLinks and provides two checks for it.
In Shiro, our new permission looks like configuration:manageCustomLinks. We protect the write actions in our store with these permission checks.
As soon as an unauthorized user tries to change custom links, an AuthorizationException is thrown.
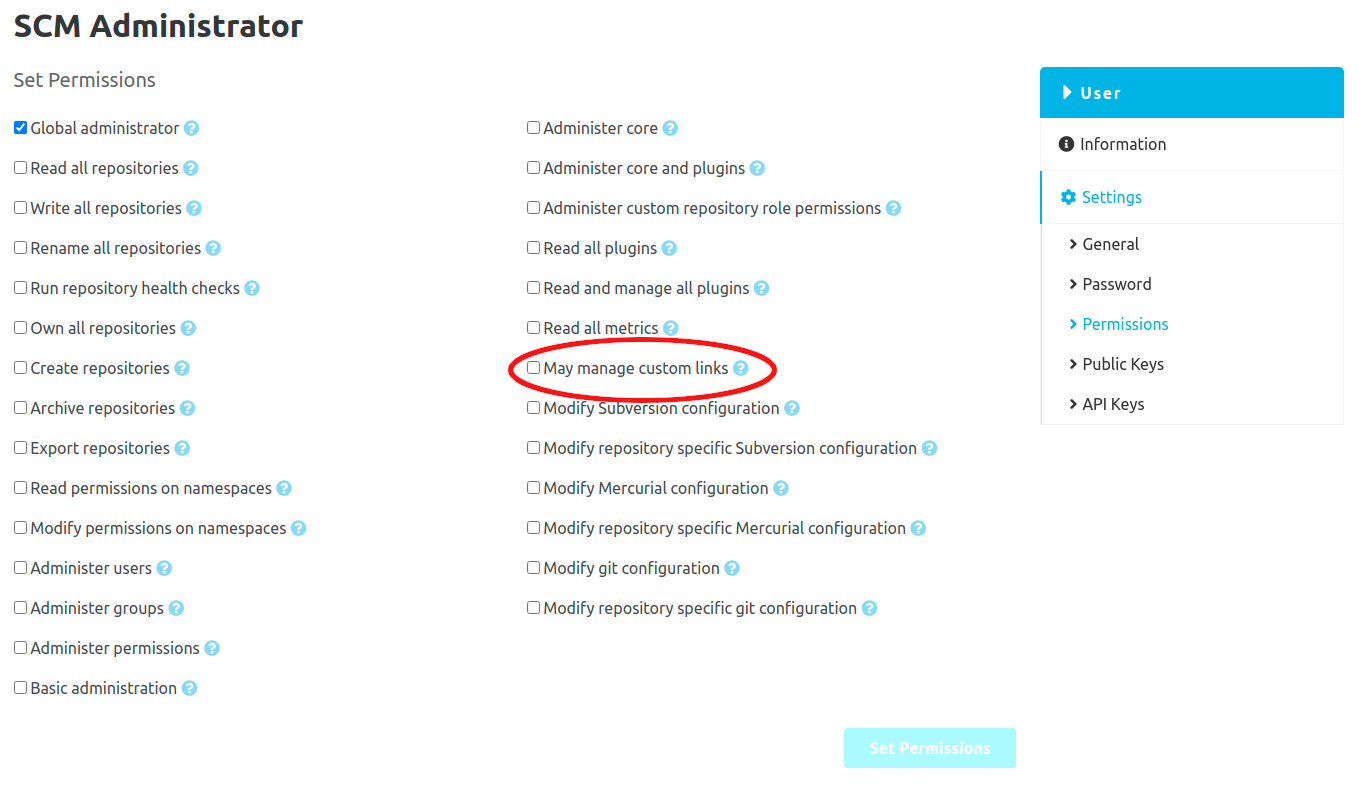
So how do users get this permission? It has to be granted to them.
However, before this can be done, we need to introduce our new permission to SCM-Manager.
To do this, we create a permissions.xml in the resources/META-INF/scm folder.
<permissions>
  <permission>
    <value>configuration:manageCustomLinks</value>
  </permission>
</permissions>
After restarting SCM-Manager, our permission should be available on the user permissions page. The automatically generated translation key can be replaced by adding translations in the plugins.json file.
REST-API
SCM-Manager uses a Level 3 REST-API
and relies on the HAL specification for hypermedia types.
To meet these requirements, SCM-Manager provides its own libraries that reduce a lot of boilerplate code.
Let’s start by creating a DTO (Data Transfer Object) from our custom links entity.
To do this, there are annotations that are placed on the data class to automatically generate a DTO object class from it.
@GenerateDto, as you can guess, creates our DTO object class.
We need to mark the fields to be included in our CustomLinkDto.java with @Include (com.cloudogu.conveyor.Include).
The second SCM-Manager-specific annotation we want to use is @GenerateLinkBuilder.
This generates a new class that contains link builders for our entire REST-API (based on the @Path annotation from jax-rs).
We decided on a specific class name RestAPI to make our upcoming examples easier to understand.
We need these link builders when adding links for our JSON responses, as we need to comply with the HAL specification.
@GenerateDto
@GenerateLinkBuilder(className = "RestAPI")
public class CustomLink {
  @Include
  @NotEmpty
  private String name;
  @Include
  @NotEmpty
  private String url;
Next, we create a REST resource consisting of three methods that interface with our store.
In addition to the HTTP verb and a mediatype, we also add the OpenAPI annotations to each method.
These ensure that an OpenAPI specification is created and that the REST-API is properly documented in the OpenAPI plugin.
As the implementation for our getAllLinks method, we first collect our links from the store,
then we map them to DTOs, appending the delete-link to each individual entity, if the user has the permission.
Finally, we wrap them in a HalRepresentation object as _embedded and add more links for the whole collection.
One special annotation which is rarely used in general is AllowAnonymousAccess.
This allows public access to this REST method as it ignores the authentication filters.
For our use case we need to place it on the @GET endpoint.
@OpenAPIDefinition(tags = {
        @Tag(name = "Custom Links", description = "Custom links plugin related endpoints")
})
@Path(CUSTOM_LINKS_CONFIG_PATH)
public class CustomLinksResource {

    public static final String CUSTOM_LINKS_MEDIA_TYPE = VndMediaType.PREFIX + "custom-links" + VndMediaType.SUFFIX;
    public static final String CUSTOM_LINKS_CONFIG_PATH = "v2/custom-links";

    private final CustomLinkConfigStore configStore;

    @Inject //jakarta.inject.Inject
    CustomLinksResource(CustomLinkConfigStore configStore) {
        this.configStore = configStore;
    }

    @GET
    @Path("")
    @Produces(CUSTOM_LINKS_MEDIA_TYPE)
    @Operation(
            summary = "Get all custom links",
            description = "Returns all custom links.",
            tags = "Custom Links",
            operationId = "custom_links_get_all_links"
    )
    @ApiResponse(
            responseCode = "200",
            description = "success",
            content = @Content(
                    mediaType = CUSTOM_LINKS_MEDIA_TYPE,
                    schema = @Schema(implementation = HalRepresentation.class)
            )
    )
    @ApiResponse(
            responseCode = "500",
            description = "internal server error",
            content = @Content(
                    mediaType = VndMediaType.ERROR_TYPE,
                    schema = @Schema(implementation = ErrorDto.class)
            )
    )
    @AllowAnonymousAccess
    public HalRepresentation getAllCustomLinks(@Context UriInfo uriInfo) {
        RestAPI restAPI = new RestAPI(uriInfo);
        Collection<CustomLink> customLinks = configStore.getAllLinks();
        List<CustomLinkDto> linkDtos = mapCustomLinksToDtos(restAPI, customLinks);
        return new HalRepresentation(createCollectionLinks(restAPI), Embedded.embedded("customLinks", linkDtos));
    }
After implementing our REST resource, our backend is ready and should already work with curl, e.g. curl http://localhost:8081/scm/api/v2/custom-links.
But how exactly does the SCM-Manager frontend know about our new REST endpoints and how to use them? We don’t want to hardcode any links or URLs in the frontend code.
Enricher
The answer is Enricher. In our case, we only need one enricher, but there are multiple objects that can be enriched. When accessing the SCM-Manager, the frontend always fetches the index (http://localhost:8081/scm/api/v2). Depending on what the index consists of, the frontend knows which pages, navigation points and actions need to be rendered. This means that all permission checks in the frontend are based on what links are present.
Example: Our user is not allowed to create repositories. He logs into the SCM-Manager and the index is fetched.
In the index we find the link to fetch the repositories. So the repositories-link fetches all the repositories that our user may see.
In the repository collection JSON response we find the repositories as _embedded and also some _links again.
We have the self-link and some pagination links, but no create-link. This means that the frontend must not render the Create Repository button.

The IndexDtoGenerator creates the index for each user based on their permissions.
We enrich this index with our custom-links links by creating an IndexLinkEnricher.
In our use case, we add two different links to the index. customLinks is used to retrieve the custom links that must be available to all users.
customLinksConfig is used to check if our logged-in user is allowed to manage the custom links on the administration page.
@Extension // sonia.scm.plugin.Extension
@Enrich(Index.class) // sonia.scm.api.v2.resources.Enrich
public class IndexLinkEnricher implements HalEnricher {

  private final Provider<ScmPathInfoStore> scmPathInfoStore;

  @Inject
  public IndexLinkEnricher(Provider<ScmPathInfoStore> scmPathInfoStore) {
    this.scmPathInfoStore = scmPathInfoStore;
  }

  @Override
  public void enrich(HalEnricherContext context, HalAppender appender) {
    String link = new RestAPI(scmPathInfoStore.get().get().getApiRestUri()).customLinks().getAllCustomLinks().asString();
    appender.appendLink("customLinks", link);

    if (PermissionCheck.mayManageCustomLinks()) {
      appender.appendLink("customLinksConfig", link);
    }
  }
}
Conclusion
That’s it. Our Custom-links plugin backend is ready. When testing it out with curl we get the data we were expecting. We can start with the frontend integration. If you can’t wait, you can already take a look at how we build the frontend. The detailed step-by-step explanations will follow in the next and last blog post of this series.
▶ curl http://localhost:8081/scm/api/v2/custom-links | jq
  % Total    % Received % Xferd  Average Speed   Time    Time     Time  Current
                                 Dload  Upload   Total   Spent    Left  Speed
100   165  100   165    0     0  23571      0 --:--:-- --:--:-- --:--:-- 23571
{
  "_links": {
    "self": {
      "href": "http://localhost:8081/scm/api/v2/custom-links"
    }
  },
  "_embedded": {
    "customLinks": [
      {
        "name": "Imprint",
        "url": "https://scm-manager.org/imprint"
      }
    ]
  }
}
SCM-Manager
The easiest way to share and manage your Git, Mercurial and Subversion repositories.
Getting started
This article is part 2 of the series „Introduction to plugin development for SCM-Manager“.
Read all articles now:
Recent discussions
Comments on this topic on Cloudogu platform


